

Introduction
Navigating the volatile landscape of trading requires a steady hand, and nothing helps maintain discipline better than a carefully structured trading checklist. In this article, we’ll delve into the critical role that such a checklist can play in your trading endeavors. Additionally, we’ll clarify the distinctions between a trading plan and a trading checklist, so you can fully understand the unique value each offers in your journey as a trader.
Why Use a Trading Checklist?
Employing a trading checklist is far from optional if you aim for regularity and self-control in your trading activities. It not only fosters discipline but also helps you stick to your pre-established trading plan. Moreover, it enhances your self-assurance by validating the reasoning for each trade you execute.
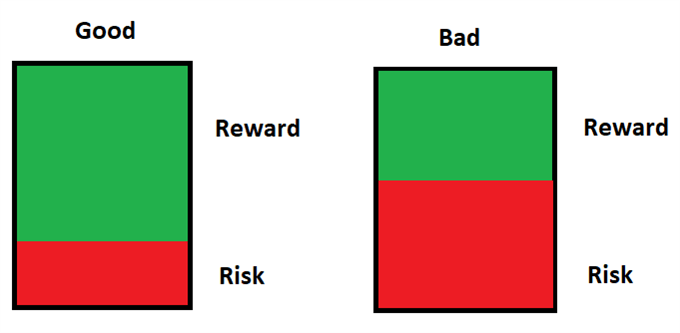
Understanding Risk to Reward Ratio: A Crucial Ingredient for Smart Trading
The significance of your risk-to-reward ratio isn’t a one-time consideration but rather an essential part of a comprehensive trading checklist. This vital gauge acts as a quantifiable outline of your approach to trading, illustrating the level of financial exposure you’re prepared to accept for a given gain. But mastering this ratio goes beyond just a rudimentary understanding; it’s about applying this metric wisely and uniformly to each of your trading actions.
The Nuts and Bolts
First, let’s unpack how it works. You determine the risk-to-reward ratio by comparing the distance from your point of entry to your stop-loss level against the distance from your point of entry to your take-profit mark. If, for instance, you’re open to risking a loss of 50 points to potentially gain 150, then your ratio would be 1:3. This suggests you could earn three times the amount you’re willing to risk.
The Psychological Advantage
Being aware of your risk-to-reward ratio offers a mental advantage. It comforts you in the knowledge that a few losing trades won’t negate overall profitability. Arranging trades with greater potential rewards than risks alleviates the emotional toll that accompanies unavoidable losses, making it simpler to adhere to your trading strategy.
Effective Risk Control
This principle lies at the heart of risk management. Following a disciplined risk-to-reward ratio shields your investments, particularly during market instability, where high losses can be incurred. This discipline keeps you centered on the overarching strategy, deterring rash or emotionally-driven actions that stray from your plan.
Adaptive Modifications
One of the perks of incorporating a risk-to-reward ratio in your trading checklist is its adaptability. Markets are fluid and can shift unexpectedly. Having a pre-established ratio functions as a navigational tool, aiding you in modifying your stop-loss or take-profit parameters as market conditions evolve.
Interaction with Other Checklist Components
The risk-to-reward ratio isn’t a standalone item. It frequently interacts with other components on your checklist such as market indicators, economic news, and managing capital risk. For instance, in a bullish market, traders may be more inclined to take on trades with elevated risk for potentially larger gains. On the other hand, during impactful economic announcements that may create volatility, a more cautious ratio could be recommended.
Incorporating a robust risk-to-reward ratio into your trading checklist offers the advantage of having an instant risk management advisor. It aids in shaping your trading decisions to align not just with your short-term aims but also your extended trading plan. By emphasizing your risk-to-reward ratio, you pave the way for a more consistent trading outcome, rather than leaving it to chance.
Financial Announcements: Steering Through the Market’s Vital Signs
Trading isn’t an isolated activity; it operates within a fluctuating economic framework. Key external variables that impact financial markets include financial announcements such as Employment Data, Inflation Indices, and Total Economic Output, among others. Incorporating a scrutiny of forthcoming financial announcements into your trading checklist is vital for risk management and capitalizing on promising prospects. Here’s a guide on why and how to focus on these announcements within your trading blueprint.
Deciphering the Announcements
Grasping the implications of each financial metric is essential. For example, Employment Data reveals the monthly net job changes in the economy, aside from agriculture. A considerable shift in these numbers could instigate market turbulence. Inflation Indices measure variations in consumer goods and services prices, providing an insight into inflation. Meanwhile, Total Economic Output serves as a comprehensive measure, depicting the total worth of all products and services created in a nation. Each has a unique role in influencing asset valuations and overall market mood.
Timing as a Strategic Factor
Financial announcements usually adhere to a set timetable and can be found on financial calendars open to traders. Being aware of these schedules allows you to thoughtfully arrange your trading activities. For instance, if a significant Total Economic Output declaration is on the horizon, you might choose to withdraw from a high-risk position or venture into a new trade to exploit likely market fluctuations.
Balancing Risk and Market Swings
The interval preceding and following a financial announcement is like walking a tightrope. While market swings can create profitable trading scenarios, they concurrently heighten risk. Acknowledging the timing and probable repercussions of these financial metrics allows you to adapt your risk-control measures, like adjusting your stop-loss and take-profit levels, as needed.
Integration with Other Elements
Financial announcements shouldn’t be viewed in a vacuum, but as an integrated component of a well-rounded trading methodology. They frequently intersect with other elements on your checklist, such as risk-to-reward ratios and market signals. For example, robust Employment Data could confirm an upward trend in a bullish market, enabling a riskier trading stance. Conversely, an adverse Inflation Index could indicate growing inflation and a bearish outlook, necessitating a more prudent strategy.
Leveraging Digital Tools
In today’s technology-driven era, traders can access a wide range of tools to monitor financial announcements. Various apps and platforms deliver real-time alerts about upcoming financial events, customized to your trading priorities. Utilizing such digital resources can offer you a tactical advantage in the dynamic trading sphere.
By including financial announcements as a critical point of review on your trading checklist, you mitigate the risk of unwittingly stepping into a market trap. This adds an additional layer of scrutiny to your trading approach, guiding you to more educated choices. Think of financial announcements as the meteorology of trading; they may not predict the exact future, but they give you a sense of the likely scenarios you’ll encounter, allowing for better preparation.
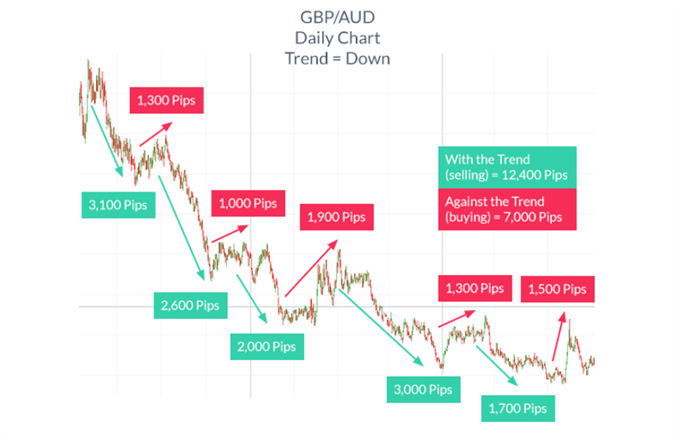
Market Trends: An Essential Element of Your Trading Framework
Navigating financial markets effectively requires a firm grasp of the broader market environment in which you’re trading. This underscores the importance of understanding market trends. Whether the market is on an upward trajectory (bullish) or a downward slope (bearish), discerning and capitalizing on these trends offers a multitude of trading opportunities. Factoring in market conditions, especially trends, is an indispensable part of any comprehensive trading checklist. Here’s your guide on how to integrate this vital aspect into your trading strategy.
Spotting Market Trends
The preliminary step involves being able to identify a trend accurately. This generally entails scrutinizing price movements and utilizing an array of technical metrics like Moving Averages, the Relative Strength Index (RSI), or trendlines. An upward trending market usually features rising highs and lows, whereas a downward trend is marked by declining highs and lows. Early identification of these patterns can yield critical insights for determining optimal entry and exit points.
The Significance of Trends
The adage “follow the trend” aptly captures why understanding market trends is crucial. Trends provide a navigational compass, streamlining your trading choices. They offer a ‘path of least resistance,’ as aligning your trades with the trend often leads to higher-probability trading outcomes. This is due to the higher likelihood of the trend persisting rather than reversing abruptly.
Risk Control in Trending Contexts
Recognizing a trending market condition can be a game-changer for your risk management approaches. For example, when you’re aligned with a robust upward trend, you might set your stop-loss beneath a recent ‘higher low’ to offer your trade some wiggle room while still limiting downside risk. On the flip side, in a bearish trend, a stop-loss could be situated above a newly-formed ‘lower high.’
Synergy with Other Checklist Criteria
Identifying a trending market is not a standalone operation; it should be harmonized with other components of your comprehensive trading checklist. For instance, the risk-to-reward ratio may tilt more in your favor when trading in sync with the trend. Additionally, staying abreast of economic indicators that could affect the trend’s momentum is equally important.
Multi-Timeline Considerations
It’s crucial to recognize that trends can span different time horizons—short, medium, and long-term. Your trading style will dictate which timeframe is most pertinent, but bear in mind that trends can intersect across these different timeframes. A long-term uptrend can encapsulate shorter-term downturns, and understanding these nuances can prevent ill-advised trading decisions.
Leveraging Trending Markets
Many traders adopt trend-oriented strategies to seize market momentum. Such strategies could involve entering trades during minor retracements within a prominent trend or utilizing breakout models to affirm trend viability. Regardless of your chosen technique, grasping that a market is trending enables you to tailor your tactics to align with prevailing market currents, thereby enhancing the likelihood of successful trades.
By making the recognition of market trends a foundational element in your trading checklist, you not only elevate the odds of engaging in high-probability trades but also instill a disciplined ethos into your trading activities. In summary, mastering market trends isn’t merely beneficial; it’s imperative for anyone committed to trading proficiently.
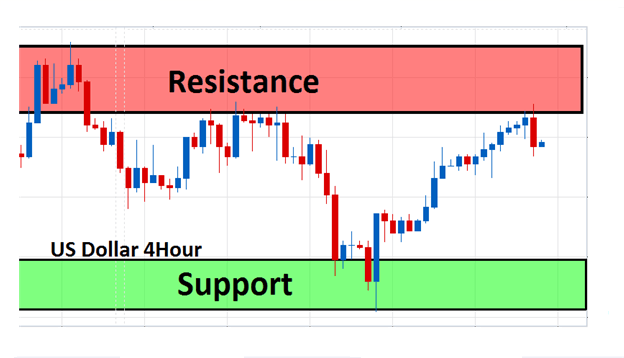
Support and Resistance: Crucial Markers in Your Trading Framework
In trading circles, the notions of support and resistance zones are almost universally recognized and implemented. These essential areas on a price graph act as psychological thresholds where market activity tends to slow down, either reversing or moving through. Making these zones an integral part of your trading plan not only assists in shaping your entry and exit tactics but also contributes to a well-rounded understanding of market dynamics. Below is a guide to enhancing your comprehension of support and resistance and embedding them into your trading toolkit.
Key Aspects of Support and Resistance
Essentially, a support zone serves as a price level where a declining trend tends to halt, given a cluster of demand or buying interest. On the flip side, a resistance zone is a price level where an uptrend may stall or change direction due to an aggregation of supply or selling interest. These zones are vital for traders in pinpointing optimal entry and exit locations, defining stop-loss commands, and assessing the risk-return profile of a particular trade.

Relevance Across Market States
The utility of support and resistance zones isn’t limited to markets that are trending; they hold equal weight in horizontal or sideways markets. In a trending market environment, support zones are often used to initiate new bullish positions or set stop-loss commands when the price moves upward. Resistance zones play a similar role but in the reverse direction. In sideways markets, these zones can serve as the parameters of the price range, offering prime buy or sell cues when prices rebound from them.
Utility in Risk Mitigation
Effective risk management is a cornerstone of successful trading, and a deep understanding of support and resistance zones is a vital element in your risk control toolkit. For example, positioning a stop-loss just beneath a support zone during an upward trend or slightly above a resistance zone during a downward trend can optimize your ability to limit losses while still giving your trade adequate room for growth.
Complementary Use with Additional Indicators
While support and resistance zones can be impactful in isolation, their potency is often amplified when combined with other technical metrics. For instance, a breakout through a resistance zone accompanied by high trade volume might deliver a more reliable signal. Likewise, additional indicators such as Moving Averages, Fibonacci levels, or the Relative Strength Index (RSI) can provide extra layers of validation, fortifying your trading configurations.
Dynamic Nature and Adaptability
It’s crucial to note that support and resistance zones are not immutable; they shift over time. A breached resistance zone may subsequently serve as a support zone, and the converse is also true. Therefore, continuous monitoring and updates are necessary to fully capitalize on their benefits. As your trading plan evolves, it’s wise to revisit these zones to confirm their current relevance.
Interactions with Economic Events
Significant economic milestones, like central bank announcements or jobs data, can produce abrupt price shifts that temporarily nullify existing support and resistance zones. Incorporating awareness of such occurrences into your trading plan can equip you to navigate these market irregularities.
By incorporating an in-depth understanding of support and resistance zones into your trading framework, you arm yourself with a seasoned, reliable instrument for enhancing market scrutiny, fine-tuning trade execution, and strengthening risk management methods. In summary, support and resistance zones should not be considered optional—they are indispensable elements for anyone aspiring to achieve trading excellence.
Risk Management Essentials
Effective risk management goes beyond being just an item to tick off on a trading to-do list; it’s a foundational pillar for long-term trading resilience and fiscal health. Ignoring this critical principle can spell disaster, ranging from substantial financial setbacks to, in the worst-case scenario, complete account depletion. The following discussion elaborates on why this aspect deserves dedicated attention in your trading checklist.
Defining ‘Capital at Risk’
Before diving in, it’s essential to clarify what ‘capital at risk’ means. It refers to the portion of your investment resources that you can afford to lose without impacting your daily life or long-term financial well-being. The percentage of risk capital you earmark for individual trades shapes your broader risk management approach.
The Emotional Equation
How much you’re willing to risk often hinges on your emotional comfort level. Overcommitting funds to a single trade can trigger anxiety, leading to rash choices like exiting a trade too soon or adjusting a stop-loss order inappropriately. Such emotionally charged decisions can undermine your strategy, resulting in more significant financial losses. Therefore, it’s important only to risk what you’re psychologically comfortable losing.
Strategies for Setting Risk Parameters: Static vs. Dynamic
Establishing risk boundaries can be approached in various ways. Some traders opt for a uniform percentage for each trade—say, 1% or 2% of their total account value. Others may choose to adjust their risk percentage based on the specific trade’s perceived risk and opportunity. The important thing is to define a consistent methodology that suits your trading strategy and risk tolerance.
Influence on Trade Size
The risk capital you’re willing to allocate directly affects the size of the trade you’ll make, known as the position size. Different approaches to determining position size exist, ranging from straightforward fixed-lot or fixed-share systems to more intricate algorithms accounting for portfolio volatility. Your trading checklist should offer guidance in this essential area.
Coordination with Other Checklist Components
The section of your checklist devoted to risk management should not be an isolated consideration. It must work in harmony with other factors, such as the risk-to-reward ratios, areas of support and resistance, and potential market-moving economic announcements. For example, a more significant risk may be warranted if a favorable risk-to-reward ratio aligns well with strong technical signals.
Periodic Assessments and Revisions
Given the fluid nature of trading, your risk parameters should remain adaptable. With increased trading experience, profitable runs, or financial setbacks, reassessing and adjusting your risk levels will help ensure that your strategies stay in sync with changing conditions and personal circumstances.
Executing Trades Effectively
The ultimate goal of a well-designed trading checklist is to facilitate efficient and effective trade execution. Think of the checklist as a map, guiding you through the maze of market volatility toward a potentially profitable trading opportunity. This tool serves dual purposes: it acts as both a protective measure and a navigational aid, reducing the chances of emotional or rash choices that can compromise your decision-making when trading tensions rise.
By rigorously assessing each element in your trading checklist, you assemble a detailed understanding of the current market climate, the associated risks, and the possible rewards. This process not only minimizes the mental strain that often accompanies trading but also boosts the chances of pulling off a successful trade.
As such, executing a trade goes beyond simply pressing a button. It represents the final piece in a series of well-considered steps and evaluations laid out in your checklist. When you reach this terminal phase, your actions should stem from a disciplined methodology. This approach significantly improves your odds of succeeding in the market, transforming your trades from speculative gambles into outcomes based on rational strategy.
Market Metrics: Complementary Tools in Your Trading Arsenal
While primary elements like grasping the market environment, assessing risk-to-reward ratios, and staying updated on economic news form the backbone of your trading checklist, market metrics offer additional refinement to your decision-making process. These supplementary indicators—such as moving averages, Bollinger Bands, and the Relative Strength Index (RSI)—function like spices in a culinary recipe. Although not the central components, they add sophistication, intricacy, and nuance, making the overall trading ‘dish’ more effective.
Take moving averages, for instance. They serve to smooth out price fluctuations, offering a more transparent view of the market’s prevailing trend. This becomes invaluable in trending markets when you need to verify the trend’s staying power. On the other hand, Bollinger Bands help pinpoint volatility levels, enhancing your understanding of the potential risks and rewards for a particular trading opportunity. When the price interacts with the upper or lower band, this may indicate that the asset is overbought or oversold, thus enriching your decision-making database.
The Relative Strength Index (RSI) is particularly useful for gauging momentum. It can hint at whether an asset is overbought or oversold, furnishing you with valuable insights into possible market reversals. This becomes exceptionally useful in sideways or ranging markets, where pinpointing the highs and lows can be pivotal for successful trading outcomes.
Trading Blueprint: How Your Checklist Functions as an Integral Part of Steady, Disciplined Trading
Your trading checklist should not be viewed as an isolated instrument. Rather, consider it a crucial extension of your comprehensive trading plan. While your overarching plan provides the framework—covering objectives, asset selection, risk tolerance, and other essential facets—your checklist dives deeper, aligning each trading action with your predetermined strategy.
For example, if your core trading approach focuses on leveraging short-term market fluctuations, your checklist should specify the criteria for identifying such opportunities. This could involve tracking specific indicators or keeping an eye on economic updates that influence the market in the short term. In essence, the checklist functions as a screening tool, admitting only those trades that satisfy your pre-defined conditions, thereby enhancing the likelihood of profitable outcomes.
Additionally, an effectively constructed trading checklist serves as a cornerstone for maintaining trading discipline. Given that markets can be erratic and emotions can spike, the urge to stray from your initial plan can become compelling, particularly when stakes are high. This is where your checklist proves its worth. By adhering to a checklist that is anchored in your overarching strategy, each trade you execute becomes a disciplined endeavor instead of an emotionally driven impulse.
Your Detailed 7-Point Trading Checklist: A Thorough Examination for Judicious Trade Execution
Navigating through the intricate world of trading can feel daunting, but a meticulously devised trading checklist can make the journey smoother. View this checklist as your guiding compass, taking you through each essential factor you must consider before executing a ‘buy’ or ‘sell’ command. Let’s explore each of these seven pivotal steps in detail.
- Is the Market in a Trend or Sideways Motion? This initial question acts as your preliminary filter. While trending markets may present higher-probability trades, sideways markets also offer their share of opportunities, especially if you’re proficient in navigating support and resistance levels. The objective is to tailor your trading approach to the current market state, enhancing your likelihood of making a profitable trade.
- Are There Prominent Support or Resistance Levels Close By? Support and resistance levels function as unseen market boundaries. Awareness of these levels enables you to establish more precise entry and exit points. If such a crucial level is within proximity, it could affect your decision to enter a trade, as well as the placement of your stop-loss and take-profit settings.
- Is an Indicator Validating the Trade? Tools like moving averages or the Relative Strength Index (RSI) can serve as secondary verification for your trade. They can help pinpoint higher-probability trade opportunities and either confirm or question your initial market assessment. However, depending solely on such indicators can result in decision-making paralysis. They should inform, but not completely govern, your trading choices.
- What’s the Risk-to-Reward Profile? Here, you assess the possible gains of a trade relative to its associated risks. A favorable risk-to-reward ratio can render even a low-probability trade acceptable. Make sure the possible gains adequately balance out the risks you are prepared to assume, thereby keeping your trading account resilient over time.
- What Percentage of My Capital is At Stake? Proper capital allocation is crucial for protecting your account from significant downturns. You’ll have to determine the portion of your trading funds you’re willing to put at risk for this specific trade. Whether it’s a set or fluctuating percentage, this decision forms a cornerstone of your risk management tactics.
- Are There Pending Economic Announcements That Could Affect the Trade? In trading, knowledge is both an asset and a potential pitfall. Scheduled economic updates, such as employment statistics or GDP announcements, can significantly alter market dynamics. Awareness of these events can guide you in choosing whether to engage in a trade or refrain from it.
- Am I in Sync with My Trading Strategy? Last but not least, confirm that the proposed trade aligns with your overarching trading strategy. A thoughtful trading strategy serves as your baseline, and straying from it tends to yield inconsistent outcomes. Ensure that the trade you’re considering fits within the broader scope of your trading goals, methods, and risk guidelines.
Consider this 7-point trading checklist as your auxiliary guide. While it doesn’t replace your innate skills or trading experience, it offers a systematic way to confirm you’re not overlooking any crucial elements before making a trade. Following this checklist not only refines your decision-making but also strengthens your risk management, equipping you to become a more effective and resilient trader over time.
Conclusion
Owning a trading checklist is comparable to possessing a reliable counselor alongside you. It guarantees that you approach your trading endeavors with readiness, control, and assurance. We’ve delved into numerous topics in this discussion, ranging from grasping the dynamics of risk and reward to incorporating economic announcements and market situations.
The distinction between an average trader and a prosperous one frequently hinges on self-discipline and thorough preparation. Pledge today to put your trading checklist into action. For more in-depth insights and useful tools, visit our supplementary materials at forexsignals.
Click here to read our Decoding the Impact of Economic News
FAQs
- What’s the role of a Trading Checklist in ensuring successful trade outcomes? A trading checklist functions as a well-organized framework that aids traders in sticking to their trade plans, sustaining self-control, and boosting self-assurance. It offers a sequential assessment process before carrying out a trade.
- How critical is the Risk to Reward Ratio in a well-rounded trading checklist? Understanding the Risk to Reward Ratio is pivotal as it helps you ascertain the level of risk you’re comfortable taking for a specific gain. This ratio guides the establishment of your stop-loss and take-profit markers, making sure you’re not entering trades without proper thought.
- Could you clarify the influence of Economic Announcements like NFP, CPI, and GDP on trading choices? These economic announcements can significantly sway the market’s volatility and trajectory. Incorporating them into your trading checklist allows you to anticipate these influences, thus evading unneeded hazards and making the most of market shifts.
- What is the article’s explanation of Trending Markets and its effect on my trading checklist? Trending Markets describe a state where asset prices are consistently ascending or descending. Recognizing if the market is trending or moving sideways is crucial for your checklist and influences your strategic choices.
- What significance do Support and Resistance tiers hold in a trader’s decision-making? Support and Resistance tiers function as critical milestones in price movements and aid in determining when to enter or exit a trade. Factoring these into your checklist offers vital viewpoints on the market’s current state.
- What advice does the article give concerning Capital Risking within a trading checklist? The article underscores the importance of determining the amount or percentage of your capital that you’re prepared to risk on each transaction. This strategy ensures that your trading activities remain calculated rather than hazardous.
- How does using a trading checklist enhance the quality of Trade Execution? A meticulously prepared trading checklist simplifies the trading routine, minimizes emotional stress, and heightens the likelihood of effective trade execution. It serves as the concluding phase, coalescing all checklist factors into implementable actions.
- What contribution do Market Metrics like moving averages and RSI make in confirming high-probability trades? These Market Metrics act as supplementary validations for your trade decisions. Although they shouldn’t be the exclusive reason for executing a trade, they assist in offering extra confidence and in refining your trade entries and exits.
- How is a trading checklist connected to your broader Trading Approach? A trading checklist is intrinsically a part of your comprehensive trading approach, aiding you in staying committed, uniform, and disciplined when following your pre-established trading guidelines.
- Does the article share any suggestions for staying informed about Economic Announcements that might impact my trades? The article advises utilizing economic schedules and other resources to stay updated on crucial economic announcements, thereby assisting you in forward planning and embedding this data into your trading checklist.
Click here to read more about Trading Checklists.